 |
| Which one first... hmmmm. |
Last year, for the Octonauts party, we did the traditional party pinata... and it was not good. The kids enjoyed it all - my girl too, and the mad scramble for candy was amusing. But as the dust cleared, Miss M was over in the corner sobbing her heart out on daddy's shoulder because SHE wanted to be the one who broke open the pinata!! It took a good 15 minutes to calm her down, and I vowed that there would not be another pinata in our parties.
So. Here comes the 5th birthday, and I am scrambling for a game to take the place of the pinata. I had done a Punch Board tree at Christmas, for a small Christmas Eve game for the kids. It was a hit! This might be good.
Note To Christmas Punch Board makers out there -- DO NOT OVER FILL CUPS!!! This thing was so heavy the cups would not have survived a vertical position with the kids punching at them. No one complained about the table game :-) or the way-too-many-treats per cup, though, so its up to you. We did one round per hour, the kids loved it!!
A tree shape would not work for a Frozen party, though... Of course, a snowflake sounded perfect. It was either that or I could try to make Olaf, but the thought of "punching" Olaf was not appealing.

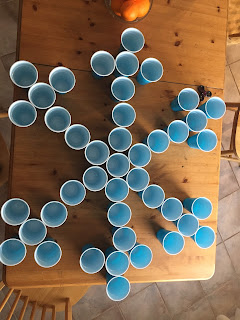
I set out all the cups to see if I could get a recognizable snowflake shape. It took a TON of cups. I had a horrible vision of trying to prop this up, and having it try to survive a bunch of little kids punching their way to treasure. But. I had a fence, so it could work... if I could find a board big enough to hand these 48 cups on!!!
 |
| Blue Solo Cup, I fill you up... oh, wait. Wrong kind of party LOL |
Using a giant piece of cardboard left over from my parents Purple Bed purchase (that box for the base was enormous) I was able to fit all 48 cups! I Hot Glued them, and used my recently acquired Paint Night skillz to add some Frozen themed snow swirls. I am not a painter, but: Voila! Elsa would love this party game!! My daughter was THRILLED to help me fill it up, and couldn't wait to play.
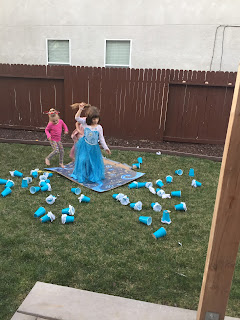
My husband Screwed this sucker up on the fence, and except for a few cups that fell off due to maker error and some nice hot sunshine :-) it was pretty sturdy!! We re-glued the cups and all was well.
 |
| Punch Board for the WIN |
Bonus:: after the party the board came down and the girls ripped off the cups to make a dance floor. We laughed and laughed. They had a "ball" hahahaha Our friends thought we should be playing some 80s dance music for them to break dance to, rather than the Frozen soundtrack.
End result, my daughter had "The best party EVER!!!"
{heart heart heart} Which is all this mama hoped to hear.
Happy Birthday, baby girl!
 |
| And just like that, she is Five. |
Used in this project:
Giant Piece of Cardboard
Solo Cups (smaller plastic cups might work better to make larger shapes)
Tissue Paper and Rubber Bands to seal the tops
Treats (less is more people, unless you plan to do it as a table top game)
Hot Glue LOTS of hot glue
Paint for decorating (optional)
Step by step instructions for the basic idea over at the East Coast Mommy blog
Happy Crafting!
-Angie
Shop Securely any time of day at my online Stampin' Up Shop - Click HERE
Join me for crafting in Patterson, CA - see upcoming Events HERE


No comments:
Post a Comment