Gift Card Holder Box Tutorial

MidnightCrafting Gift Box Christmas
How to make cute gift card holders.
Modify the belly band for any occasion!
These are great boxes to present gift cards all year long! Embellish the belly band with a flower, or heart, or whatever else fits your theme or recipient. Cute!!

I've been asked for a tutorial on the gift card holders... so here is a REALLY quick one before the holiday madness hits my house!! - forgive the blurrier-than-usual photos and very un-red paper color, the Craft Central is waiting on an order of Red card stock, and I am stuck in the kitchen! With Thanksgiving tomorrow I'm sure you understand! LOL - 

Gift Card Holder
These I did for Christmas with a Santa theme, you've seen the Santa Belt all over Pinterest I'm sure! It's so cute - and easy to make! Some red, some white, some black with a buckle! Bam - Santa!
I've made these cute treat boxes from Sharon Cheng over at SharonCheng.com and love how the box opens. It encloses the box when closed. You'll have to make one and see it in person, its very elegant. The boxes Sharon makes are cut and folded all from one 8.5 x 11 sheet! I wanted the box to hold a gift card, but they are a little different dimensions than those treat boxes.

Using your handy-dandy Paper Trimmer & Scoring blade...
Start with and 8.5 x 11" sheet of Real Red Card Stock. Cut it in half at 4.25" on the short side. Cut one half to 4.25 x 9.25"; and the other half to 4.25 x 5".
You will also need
2 pieces of Whisper White, each cut to 4.25 x 1"
1 piece of Basic Black, cut to 1.25 x 10"
1 piece of Brushed Gold Card Stock, a long strip 1.75 x 10"


Take your large red card stock piece, use your score blade on your Stampin' Trimmer to score on the 9.25" side: 2" and 2.75" and 6.5" and 7.25.
On the 4.25" side score at: 0.75" and 3.5"
From the center section - the X in the photo above - you're going to Cut the center outside strips off. This section is the base of the box.
Imagine I am a crisp photo of red card stock! 
You'll then CREASE all the score lines.
Add glue to the outside of the smallest little flaps. You want the edge of the box to be smooth, so these little flaps get glued inside the lid.

Once both sides are assembled, you'll move on to the tray inside the box.
I'm really a red piece of card stock. At heart.
On the small piece of red, you are going to score 0.75" on all sides. then Cut each flap as marked above - on the 5" sides! Glue as marked in the picture (G) on the inside of the long flap corners. You want the edge of the inside box to be smooth so the lid closes easily. WATCH this part - the box wont open and close well AT ALL if you adhere these flaps the wrong way! Ask me how I know!! Had to redo the whole half dozen I made because I glued the lids opposite. :-/
Should look like this:
Makes for a smooth edge for the lid to close down on. Center your tray in the center, about 1/8" in from each end of the box. Before you really glue it down, check that the lids open and close ok! If you have to remake one or the other, its easier if its not the whole thing! Again. Ask me how I know... Sigh. Boxes and I have issues.


Take the two small white strips, score them at 0.75" from each end, and adhere to the edges of your box - these are the "fur trim" on Santa's Coat! ((You should probably add these earlier, like when the box is flat, but I am rushed & added them here!!))

The edges of your box will overlap slightly, this will be held down by the belly band.
For the belly band you'll use the strip of black. 1.25" x 10"

Score the strip at 2.75, 3.5, 7.25, and 8.0".
then you'll want to punch 3 holes on each side of the center strip for your 'Belt holes'. I used the 1/4" Hand Held Punch, and it is helpful to measure and pencil in some reference marks for a nice even line! Start about 3/8" in from each edge of the center score marks, the holes will be about 1/4" apart. 

(Imagine a photo here, my son has stolen my punch, what I get for having crafty kids!)

For the Belt Buckle, I used the Brushed Gold strip. I was making a half dozen pieces for the craft fair, so this is easier than it sounds! I made 6 pieces from one strip. if you are only making one, you need a square of gold that is 1.75". 
On the strip you want to again pencil in some reference marks - 3/8" in from the top and the left edge (or right edge, whichever works for your handed-ness). You're going to hold the strip and punch using the 1" square punch on these marks to make the center hole/square of the belt buckle. There are probably easier belt buckles out there, I just was trying to match the picture. Feel free to share your better buckle! 
Yes, I'm stingy with my Gold paper!! Imagine (again) this is Gold! 
 

Then cut this square at 1.75 and you have a belt buckle! Adhere on top, and in the center, of your black strip with two pieces of sticky strip. Place the band around the box, make sure it is tight enough to secure the lid, but loose enough to slide off and on, then use a nice piece of Sticky Strip to close the belly band.

Add a fabulous gift card, maybe some candy, and there you have a really festive gift!!
If you'd like a quick coordinating gift tag, there is also a tutorial for the Santa Hat Gift Tag HERE. 

I'm working on some Birthday and Valentine boxes, hopefully I'll remember to take pictures when I'm in the craft room working on these, instead as I am baking up a storm in the kitchen!

Have a Happy Thanksgiving!!
Hope you get some crafting in among all the holiday hustle this weekend!
-Angie

To shop for the supplies used in today's project, please click on any item shown below to go directly to my online store. Or to see all the quality craft supplies Stampin' Up! offers, please visit www.MidnightCrafter.StampinUp.net 


Built for Free Using: My Stampin Blog

Find me on Facebook at www.Facebook.com/MidnightCrafting 

Read More »

Craft Fair Items - December Events

MidnightCrafting.com Merry Clothespin Wreath - Flash Back DSP, Gold Foil Specialty Paper
Merry Clothespin Wreath
Flash Back DSP, Brushed Gold Card stock, Candy Dots, Gold Sequin Trim 
Events in December 2014 -
I will have these Items, and more, available at the events (click on the link in the header of this blog) in December, and I can also sell Locally (see Facebook Page for more information).

MidnightCrafting.com Punch Art Bookmarks Stampin Up
Bookmarks:
Various Stampin' Up! Card Stocks, Chevron Ribbon,
Retired Festive Flurry Stamp & Die, various Retired DSP and ribbons
Tutorial HERE
MidnightCrafting.com Top Note and Christmas Bliss Stampin Up
Simmering Potpourri - Pinterest Recipe for Christmas
Top Note Die, Christmas Bliss, Retired Scentsational Season
4 x 6 Cellophane Bags
Recipe on Crafty Night Owls HERE

MidnightCrafting.com  Stampin Up Gift  Chocolate Treat Punch Art Owl Builder Christmas REindeer
Chocolate Candy Treats - Reindeer, Christmas Lights Punch Art :
Owl Builder Punch, Modern Label Punch, All is Calm DSP, 1" x 8" Cellophane Bags, Lost Lagoon Ribbon, 1/8" Silver Ribbon, Handheld Stapler, Whisper White Card Stock.

MidnightCrafting.com  Stampin Up Gift CArd Holder Christmas Tree
Gift Card Holders
1/8" Gold Ribbon, Retired Ribbon, Retired DSP,
Chocolate Chip Card Stock, Brushed Gold Card Stock, Star Punch

MidnightCrafting.com  Stampin Up Gift CArd Holder Santa Christmas
Gift Card Holders & Santa Hat Tag
Real Red, Whisper White, Basic Black, Brushed Gold Card Stocks; 1/8 circle Handheld Punch;
Box Tutorial HERE
Santa Hat Tag Tutorial HERE

MidnightCrafting.com  Stampin Up Gift  Christmas Snowflake Cocoa Mug Hot Chocolate Treat
Peppermint Chocolate Mugs (treat and/or gift Card Holder):
Frosted Sequins, Real Red, Marina Mist and Whisper White Card Stocks;
Retired Bigz Snow Flurry Die, Retired Scentsational Season,  Retired Ribbon
Mug Template HERE 

MidnightCrafting.com  Stampin Up Gift  Christmas Clothes Pin Wreath
Joy Clothespin Wreath - Retired DSP & Card stock, Retired Ornament Punch

MidnightCrafting.com  Stampin Up Gift  Christmas Clothes Pin Wreath Snowflake
Noel Clothes Pin Wreath:
All Is Calm DSP, All is Calm Snowflake Embellishment,
Retired Festive Flurry Stamps and Die; Silver Glimmer Paper,
Lost Lagoon, Whisper White Seam Binding, Soft Sky Seam Binding, and 1/8" Silver Ribbons

MidnightCrafting.com  Stampin Up Gift  Christmas Candy Box Belly Band Christmas Tree
Candy Treat Boxes:
Bermuda Bay, Pool Party, Chocolate Chip and Very Vanilla Card Stocks,
Silver Glimmer Paper, Basic Jewels Rhinestones, Retired DSP, Star burst Framelits, Star Punch
Folded Christmas Tree Tutorial HERE 

Paper Pumpkin Prepaid Subscriptions
More Information HERE


Happy Crafting!
-Angie
December Events and Facebook Page - More information - 

For these supplies, used in the above projects, and more quality Stampin' Up! products, 
Please visit my online store by clicking directly on any image below, or go to

Built for Free Using: My Stampin Blog
Read More »

Gift Tags - Santa Hat - Punch Art

Santa Hat Tutorial MidnightCrafting Stampin Up Punch Art
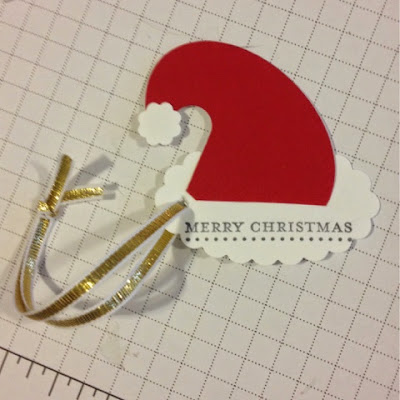
Santa Hat Punch Art Gift Tag
I missed card making today! I did accomplish several other projects, which is great... but cooking, grocery shopping, and laundry are just not as 'fun' as playing in my craft room!

So, I'll share a little cuteness from last week. :-)
I made these tags to go with my gift card holder boxes. They're fairly easy (the tags, not the boxes!) and quick to pull together, perfect for you busy crafters out there!

You need 4 punches:
the Large Oval, Scallop Oval, the 1/2" Circle and the Word Window Punches.
You'll need White card stock, Red card stock, and a ribbon or bakers twine.

To Make this Gift Tag:
  1. Punch your shapes: Punch out one Real Red Large Oval and one Whisper White Large Oval. Punch out one Whisper White Scallop Oval and one 1/2" Circle.
  2. Glue the two large ovals together, but only about halfway! (see photo)
    Glue two large ovals together, but only halfway
  3. Stamp your greeting onto the scallop oval. (optional) The hat part will cover the top portion of the scallop, so your greeting has to fit in the bottom half of the oval.
    Optional Greeting - add to bottom half only
  4. Take your Word Window Punch and position it as in the photo, angled upwards towards the top center - make sure this is the end of the oval that is glued together!!
    Punch the glued end!! The bottom will need to remain open in the next steps.
  5. Cut a slit in the bottom center of the scallop oval, about 1.25" long.
    Slit will be approximately in the middle, and just over an inch long
  6. Slide the larger oval into the opening, with the red side passing through the hole, the white side overlapping the back of the opening.
  7. Glue the ovals together on the back side. This serves two purposes - it adds some reinforcement to the tag; and it will provide a nice spot to write your To / From info!
    Glued together, the white and red ovals meet to secure the scallop bottom part
  8. Add the white circle to the tip of the "hat", trim excess from the point if needed.
    Tah-dah! Cuteness!

  9. Attach your ribbon or string, and add a To/From stamp to the back (optional).
  10. Attach to gift and give a loud HO-HO-HO!! (OK, that part is completely optional, lol)
These little sweeties would make cute bookmarks, or actual 'hats' to add to other punch art, and even ornaments for those little mini-trees! Maybe a cute garland.... OK! :-) You get the picture!

Have a lovely evening!
I hope you got a few of those great Door Buster deals - if not, RUN don't walk to www.MidnightCrafter.StampinUp.net, and add some goodies to your cart before those deals disappear at Midnight (Mountain Time)!
:: Remember to checkout with the Hostess Code XMQKDG64 and enter to win the Everyday Occasions Card Kit I'm giving away! Every $25 spent using the Hostess Code will give you one entry into the drawing! More info on the giveaway is at the bottom of THIS POST. ::

Happy Crafting!
-Angie

Read More »

ONLINE EXTRAVAGANZA WEEK! --OLD-- 2014

SHOP NOW - Quantities ARE LIMITED
EDITED TO ADD 2016 Link - Sale Nov 21st to Nov 28th 2016 DEALS CLICK HERE

2014 Online Extravaganza 


Contact Me for your Own Hostess Code - shop with it, 
and individual purchases will add up! 
$150 Total will earn you Hostess Rewards. 
Share your code with family and friends 
- these deals are AMAZING! 

Door busters will be available the first and last day only, for 24 hours and while supplies last!!

First one begins at 12:00 AM (MT)  on November 24, 
running through 11:59 PM (MT) that same day.
Shop Early at www.MidnightCrafter.StampinUp.net
The second begins at 12:00 AM (MT) on December 2, 
running through 11:59 PM (MT) that same day.
SHOP EARLY - www.MidnightCrafter.StampinUp.net

Limited items at discounted price are available. 
Once discounted items run out, items will be available at regular price.

You MUST USE THE BUNDLE CODES from the EXTRAVAGANZA BUNDLES! 
Regular item codes will get you REGULAR PRICE!
Bundles are while supplies last only.

Shop Early!! 

Regular items from current catalogs can be included onto your Extravaganza Orders.
Enter To Win this Kit! 1 entry for every $25 ordered
 (not including shipping and tax) 
USE HOSTESS CODE XMQKDG64 TO ENTER
Online Orders Ship Directly To You
Kit will be mailed out to winner on December 3rd.
Download the Entire List of Items available 
and make your wish list ASAP!

Happy Crafting SHOPPING!!!
-Angie

HOW TO ENTER HOSTESS CODE:
Type or Copy & Past Code into lower Left side of Order, and hit Apply. Look Below the Red Special Offers Box. You may have to SCROLL DOWN to see the code box if you have added items to your cart! Once Entered, the name should appear Online Extravaganza MidnightCrafter.

To Shop my Stampin' Up! online store, please visit www.MidnightCrafter.StampinUp.net 
Find me on Facebook at www.Facebook.com/MidnightCrafting 
Read More »

Christmas & More at Newman Shopping Extravaganza - Nov 21-22, 2014

Simmering Potpourri - Hand made in my kitchen
I will be out at The Purple Rose Boutique 
Shopping Extravaganza with goodies galore!!  
1135 Main Street Newman, CA
Friday Noon-4pm
Saturday 10am - 4pm
I'll be inside on the first floor -  Come By and Say Hi!!
(Tempting Photos Below)

Get started with some Christmas Stocking Stuffers, Teachers Gifts, and Coworker Gifts! I have several Christmas Wreaths and some Christmas Banners. Thanksgiving treats - table favors or hostess gifts?

I'll also have special Extravaganza special offers with purchase of any of the Paper Pumpkin Prepaid Subscriptions! A great gift for friends, family - yourself! Find out more about Paper Pumpkin HERE!

Here are photos to tempt you :-)


Gift Card Holder

Santa Gift Card Holder


Hot Chocolate Mugs - can also hold a gift card!

Book Marks

Candy Treat Boxes (includes candy!) Folded Christmas Tree
Clothespin Wreath - Joy Ornaments

Clothespin Wreath - Merry Ornaments Gold

Clothespin Wreath - Noel Snowflakes Vertical Banner

Thanksgiving Jars - look great lighted or just out on your table

Clothespin Wreath - Give Thanks / Fall / Thanksgiving
Hope to See You There!
1135 Main Street Newman, CA
Friday Noon-4pm
Saturday 10am - 4pm

Happy Crafting!
-Angie
To Shop my Stampin' Up! online store, please visit www.MidnightCrafter.StampinUp.net
Find me on Facebook at www.Facebook.com/MidnightCrafting
And follow me on Twitter at www.Twitter.com/MidnightCrafter
Read More »

Feel Goods Daydream Medallions

Daydream Medallions and Feel Goods
Clean And Simple, again, today. I'm finishing up preparations for a two day Shopping Extravaganza in Newman. (Come By & Say Hi!) I do think I will embellish these, but I think I have to decide which basic version I prefer before I step it up!

Which do you like best?

Daydream Medallions done from dark to light from outer edge
The first card I thought I'd coordinate the outer edge of the medallion with the Hello Honey colors in the frame layer and sentiment (from the Feel Goods set). I used Hello Honey, So Saffron, and Daffodil Delight for an ombre effect. I was going for a "sun" image, but I thought it was a little too dark, and separated the medallion from the sentiment too much. Not terrible, but not quite what I was going for.

Medallion done from lighter to a dark center
The second card I used the Daffodil Delight on the outer layer, using Daffodil then So Saffron, Daffodil again, and only using Hello Honey on the innermost ring. I think it coordinates the card a little better. I also like that I could bring it all the way out to the sentiment, giving a little more of a sun shape to the image, and that it links to the sentiment and makes the card feel more balanced overall.

And this concludes today's presentation... Sorry, I also use these posts as notes to myself to remind me what was going on with these cards, I have a terrible memory!!

Anyhow, perhaps a followup post on the stepped up version of this. A little bling would add some sparkle to the sunshine theme. But that will most definitely be on another day, projects abound!!

If you're interested in the beautiful Daydream Medallions or the Feel Goods stamp sets, I have linked them below. Click the image for more information and to purchase. Great sets, the medallion has a fantastic framelits bundle that makes gorgeous flowers for gift decor, layered cards, and memory keeping embellishments and frames. ;-) Just Sayin'!

Happy Crafting, 
Angela Bodas Midnight Crafter

Need a Great Gift Idea for the person on your list who has EVERYTHING? 
Give the gift of Creativity with a Prepaid Paper Pumpkin subscription! A ready-to-make project delivered each month, they can enjoy Christmas all year! (or a month or two, your call!) 
Find out more 

Built for Free Using: My Stampin Blog


Read More »